Showing posts with label tutorial. Show all posts

Monday, October 8, 2012

31 Days of Halloween 2012 ~ Day 8

Pin It

I need 36 hours in a day and 10 day in a week. Pretty please.

I am going to have to start in preparing for the holidays in January if I want to get everything I'd like to make done before the holidays roll around again next year. And these are on my list!

Click on the picture for this 'How to Make Human-Size Ghosts' tutorial from the DIY Network. There are floating ghosts, rising ghosts and even dancing ghosts. I need more time!!


Fore more 31 Days of Halloween...

Friday, October 5, 2012

31 Days of Halloween 2012 ~ Day 5

Source

I saw these adorable Mummy Twinkie Pops on Pinterest and couldn't wait to share them with you. The tutorial for these can be found over on Confessions of a Cookbook Queen. I love a treat that's relatively easy but makes a big impression. Not to mention delicious!


For more 31 Days of Halloween....

Wednesday, October 12, 2011

Handmade Costume Ideas ~ Day 12

I don't have anything together for Halloween. I am starting to panic. Just a little. What are you going as?

I found some really cute ideas and thought I'd share with you......

Baby Dragaon


From Parents.com


DIY Superhero


From Parents.com


Cops & Robbers


From Amy @ Living Locurto

This choice could do it for the whole fam and I'd be D.O.N.E.


Alien Abduction


From FamilyFun.com

I'd really love it if boy #1 would let me make him this for Halloween. It's such a great costume! Right!


Pumpkin


From Martha Stewart.com

This looks easy. I like easy.


Spider Web-Mommy & Baby Spider


I wanted to do this last year with the baby but by the time Halloween rolled around he was less than 2 months old and I was more than sleep deprived.

I really think I'm going to do it this year. How bout you?


Tuesday, October 11, 2011

Madame Has Lost Her Head - Mini Tut ~ Day 11


Just a mini-tutorial on how I made Madame a few years back should you like one of your own...


First wrap entire base in batting making sure neck stays slim. Wrap two lengths of wire (making sure to measure first so they look proportionate) with foam or batting leaving enough wire on each end to wrap around lamp base where shown.

Wrap arms and "body" with desired dress material making sure to bunch it up in the front of the body so that it resembles a bodice. Attach arms by wrapping wire where shown and pull up arm material to cover and also to puff up the sleeves. You may also want to use pins to keep things in place.

Attach collar where shown and wrap with additional dress material to form high neck dress. Adorn with broach. Wrap a strip of material around base to form waist.

Stuff a pair of gloves and tuck the ends of the arms into the gloves.

Carve your pumpkin with a grusome face and adorn it with a hat. I glittered a simple straw hat from the craft store and added some dried flowers and aged crepe paper bow. Secure the hat with long pins into the pumpkin.


Hope you enjoyed!


P.S. Pumpkins rot quickly inside and attrack maggots. Please don't ask me how I know.....
........CONTINUES

Saturday, October 8, 2011

Happy World Zombie Day ~ Day 8


Did you know it is World Zombie Day? Did you know there was such a thing? Well. There is. And it's today. So I hope your zombie day was a happy one.

If you were unaware of World Zombie Day I consider it my duty, not only as a Halloween and zombie lover but also as a cheesy zombie movie lover, to inform you. You may find additional information on World Zombie Day here:


Find out how to zombify your photos here:
If you don't have photoshop, or don't want to go to the trouble, you can always zombify your photos with Picnik. Upload a pic, navigate to edit, choose zombify. Done!


Join the World Zombie Day Facebook page here:
World Zombie Day on Facebook

Zombie Movies You Could Watch:

Dawn of the Dead

Night of the Living Dead

28 Days Later

Day of the Dead

Braindead

Resident Evil

Return of the Living Dead

Land of the Dead


That's it you crazy Halloween lovers! More from your faithful 31 days of Halloween blogger tomorrow.....


..........CONTINUES

Friday, September 30, 2011

We Gone Party Like It's My Birthday!


Today, because it is my birthday, and because I like to get ready for my favorite time of year on my birthday, that's exactly what we're gonna do! For 31 whole days!

Starting tomorrow, October 1st, Peach Street's 31 days of Halloween will be jam-packed with tutorials, DIY decor, freakishly delish recipes, ghost stories and more!

We'll welcome some special guests on halloween makeup and the paranormal. Plus, we'll discover the greatest handmade costumes out there!

And, last but certainly not least, I am excited to announce the upcoming launch of my YouTube channel. I'll be offering you DIY decor, tutorials, recipes and more in video....which I have to admit, the idea of, is really kinda creepin' me out. Do you want to see me on video??

I hope you'll join me for what's sure to be an awesome time. And, if you're brave, grab a button and share the love.

Monday, July 18, 2011

Vinegar & Steel Wool Wood Stain


It is no secret that I like "old" things. My child used to make me pictures at preschool then crunch the paper up into balls and unfold them again before giving them to me because as he said, "Mommy, I know how you like old looking things". Gahhh I love that little boy!

It isn't just about how old things look, though my favorite color is 'chippy blue' because it isn't my favorite unless it's chippy, it's also about the story old things tell. They are so much more interesting than something shiny and new.


I saw the coolest thing on DIY Network last night on This NEW House (Japalachia - Episode DTNH-201H). A man who was building his house in the North Carolina mountains wanted his wood exterior to have an instant weathered wood look. I wish I could show you a picture of that house. It was huge! And each and every board had been treated with a vinegar and steel wool stain.

Vinegar and Steel Wood Stain


Man. I wish I had known about that a month ago! I would certainly have used that technique on Sheila. For now, I'm wracking my brain for a project I can use it on. I think I have one in mind. For now, I thought I'd share with you what I learned about this technique. And I beg you, if you use it, or already have, let me know. I would love to see how it turned out!


Vinegar Steel Wool Stain How - To


Start with unfinished wood. If you'll be refinishing an already stained or painted piece make sure to remove all traces of the previous finish. Wipe the wood down. **NOT INTENDED for antique pieces. The wood may not be able to handle the acidic process. Do not use if your piece is priceless or irreplaceable.

Apparently using different vinegars can produce different stains. For example, an apple cider vinegar (or white vinegar, though apple cider seems to produce quicker results, some say it's the extra acidity of the apple. The DIY guy used Apple Cider Vinegar) makes a slate gray stain (think Restoration Hardware!) and with a nice Balsamic you get a brownish green color. Some folks even mix tea or a Rit dye to vary the color results.

So. Choose your vinegar.

Wash steel wool in warm water to remove oils used to prevent rusting.

Use REAL steel wool. Apparently there are generic versions out there that aren't the real thing and that just won't work.


Choose 00000 steel wool. Completely cover steel wool with vinegar of your choice. Some variations say to use half water, half vinegar but that might water the color of your stain down - again, the DIY guy used just vinegar and steel wool. However, if you find that your stain is too dark, you might decide to add a little water. Keep in mind though that you'll be sanding the final product and that will lighten it up a bit as well.

Soak your steel wool overnight covered tightly in a glass jar. It may take up to 48 hours but if you've used the right steel wool (remember real steel only) and washed any oils from it prior to use, you should see results pretty quickly. The stain is ready for use when the steel wool has completely dissolved.

Test your stain in an inconspicuous spot or on a scrap piece of wood. Just be sure to use the same kind of wood. As with different vinegars, different woods will respond differently giving you different colors.

Brush or wipe stain on in even strokes just as you would any other stain. Wipe off any excess. If you find you want a deeper/richer color tone, try soaking the wood in the stain.

Allow the wood to dry completely then sand lightly with 220-grit sandpaper. Seal the finished product with an oil, such as Tung oil or a natural wax. Be sure to research which of these would work best for your project and the finished look you desire as some of them can change the color or finish when applied.

Oh. And I guess I should tell you, it stinks. Alot.

Finally, and most importantly, send me some pictures or a link! I wanna see!!

Thursday, June 23, 2011

The Fab Four Get A Makeover - Part Deux


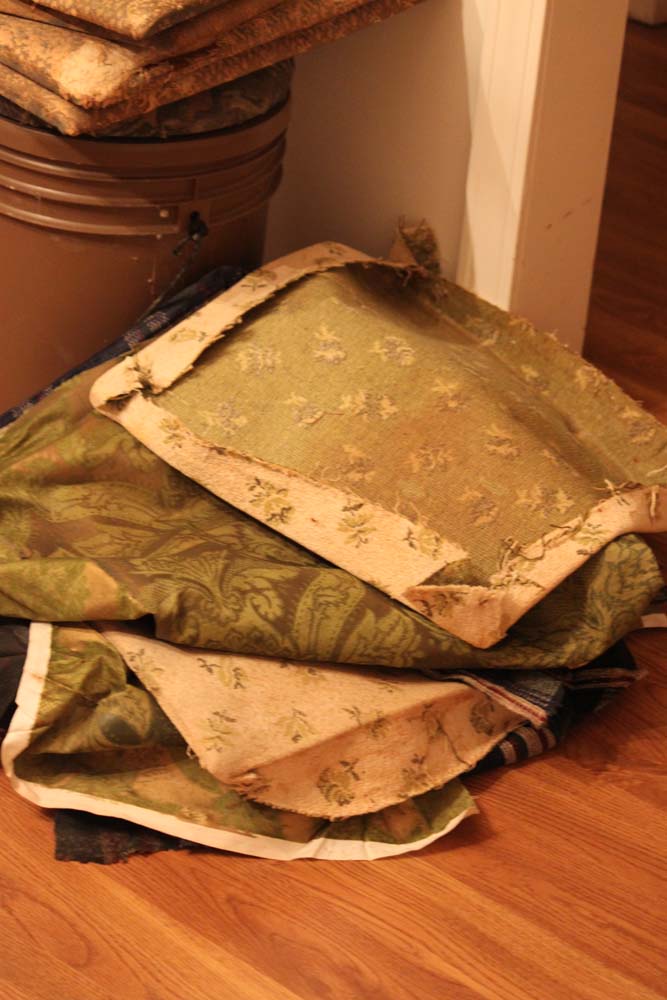
After getting rid of that pile of old, sticky clothes, the girls went for their "spa" treatment.


I love those pretty little medallions. They're gonna look great with some light distressing later.


I think I could probably have skipped the sanding here because I don't plan on restaining the chairs. But I did it anyway for good measure.


After a thorough sanding, the girls needed a bit of patching up. Not because they aren't good solid chairs but they did have some gaps here and there and that made them creak and sqeak when you sat on them. The last thing I wanted, once I had them all gussied up, was to have my guests sit on them and wonder if they were sturdy.

I had to decide how I was going to get the glue down in those gaps without taking the chairs apart. I finally decided if I put some wood glue into a plastic baggie then I would be able to slip it into the gap and squeeze in the glue.


I borrowed some of my husband's tie down straps and wrapped them around the chairs, wiped up the excess glue that pushed out and waited for them to dry...

Stick around for Part 3, A New Wardrobe & A Fresh Face {Reupholstering & Painting Chairs}

In the meantime, here's another sneak peek at "the other" project I'm working on!


Thursday, June 9, 2011

EAT - Your Words * Your Way {Tutorial}


This post should start out...

Hello. I'm Jamie and I'm a Projectaholic. Because I'll do a project at anytime, for any reason (or no reason at all) and I cannot help myself.

Back in January I discovered a blog called Shabby Chic Cottage. Apparently Gina is a genius at making simple fabulous. She is such a genius she was featured on the Etsy blog, I think it was, and that's how I found her.

I had been seeing these large, metallic gold, letters at Hobby Lobby for forever. I loved how big they were and the font was great but there was just something about that gold. It was too much like brass (which I hate) and I honestly don't really care for gold. You know, unless it's weighted, like in karats.

Anyway, I didn't really have any intention of buying any until I saw Gina's. Gina was going for silver. Well, I don't need silver either, though I like it ever so much more than gold. And that was that. I was over it. Until...

These letters are 50% off almost every week at the Hobby Lobby. And now every time I walk by them I think about Gina's. Then one day I thought how can I pass up doing something with $5 letters?

"Whitewashing" Letters Tutorial


At first I tried sanding them. Not so much to remove the gold, because I actually want it to show through a bit when I'm done, but because I know paint is not going to adhere well at all to this surface. BUT, I DO NOT recommend sanding them for two reasons: 1)It doesn't do any good! and 2) It smells funny when you do and I'm thinking that might mean it isn't safe. But that's okay because I have another plan.


I cover it in a light coat of Delta Ceramcoat in Magnolia White (I love this color!).


After that's dry I do another coat. It's great because the paint doesn't completely cover what's underneath so it gives it a whitewashed apperance without all the work.


I like how this looks but I want a little more contrast. My kitchen is a honey yellow with robin's egg blue accents. So I decided to add some blue. I use Folk Art's Sky Blue because it's what I have on hand.


I don't want the letters to BE blue I just want some highlights here and there. I use a dry brush technique and stroke on some blue very lightly in random places. If I get a little too much blue in one spot, I go back over it in white also using the dry brush tecnhique.


Once they're dry, I, VERY lightly, sand just the edges. I really like how the gold comes through. Gold in smalls doses. That I can handle.


THEN, and this is important if you don't want your paint to scratch off every time something comes in contact with them, I put on a coat of Mod Podge. Did you know you can use this stuff on everything! I love it.

Now. If you figure your letters are never going to be touched again once they're up and hanging, feel free to skip this step.

(Letters are hanging above Harriet. More on her later)


I think they turned out quite nice for $15, some paint and very little elbow grease! How about you? Wanna try it?

Related Posts Plugin for WordPress, Blogger...
I'm A Member of Art Dolls Only Gettin Creative Every Day Fan of kevinandamanda.com! Free Fonts. Recipes. Scrapbooking. Photography. Blog Design. Tutorials. Giveaway. Everything you're into! My Repurposed Life mmm button Roots And Wings Co U Create ec grab button BWS tips button BWS tips button frou-fruGal Ana White - making a home with handmade furniture and other DIY projects Craft DIY Ideas Show and Tell