Showing posts with label food. Show all posts

Monday, October 1, 2012

31 Days of Halloween 2012 ~ Day 1


Pin It

It's my very favorite time of year again and you know what that means - My 3rd annual 31 Days of Halloween!

I know I've been missing around Peach Street these days and I am very sorry about that. I've been anxious to get back over here and begin blogging again and this is the perfect excuse to do so. If you're curious what I've been up to, please see my other blog, Southern Revivals - my furniture refurbishing and home decor blog. Hopefully you'll see that I haven't totally abandoned the blogging world, after all!

Let's get the show on the road, shall we?

Photo by: Antonis Achilleos/Halloween Celebrations

I want to turn every mirror into a spook show after seeing this project on the Woman's Day website but the effect is permanent and I don't think I could afford the therapy my children might need after seeing a ghost in every mirror in the house for years on end. So, I'll be plundering the junk stores for cheap mirrors because this is an awesome must-do project. Click the picture for the tutorial.

Happy 31 Days of Halloween!


Saturday, October 29, 2011

Sloppy Jacks Recipe ~ Day 29

A fun take on Sloppy Joes. The perfect pre-trick or treat dinner.

What you need:
1lb of ground beef
Small can Manwich
1 Refridgerated Pizza Dough
Chives/Green Onion tops cut in 1" pieces
Orange Food Color Spray

What you do:
Brown your meat; drain
Mix in 1/2 - 3/4 of the can of Manwich(using the whole can will make your meat too wet and the inside of your sloppy jacks will be soggy)
Set Aside

Roll out pizza dough and cut in three sections; across horizontally then vertically making 9 squares of dough.

Place a dollop of meat mixture in the middle of each square. Fold corners in and pinch dough together. Place pinched sides down on ungreased cookie sheet. Bake on 350° for 20 - 25 minutes.

Let cool slightly then spray with orange food color spray. Make a small hole in the tops of your pumpkins and put in your chive or green onion.

Serve to your Ghouls and Boils. Maybe they'll eat less candy that way. Maybe not.

Enjoy!

Thursday, October 13, 2011

Quick & Simple Halloween Recipes ~ Day 13

Seeing on how behind I am in my Halloween planning this year, these recipes sure will come in handy!

From Taste of Home


Ogre Eyes Hot Chocolate
8 Servings
Prep/Total Time: 25 min.

Ingredients

8 cups milk, divided
1 cup mint chocolate chips
1 cup instant hot cocoa mix
16 large marshmallows
16 Crows candies
16 lollipop sticks

Directions

In a large saucepan, combine 1 cup milk, chocolate chips and cocoa mix. Cook and stir over low heat until chips are melted. Stir in remaining milk; heat through.

Meanwhile, cut a slit in top of each marshmallow; insert a candy. Carefully insert a lollipop stick through the bottom of each marshmallow and into each candy.

Pour hot cocoa into mugs or cups; place two prepared marshmallows in each cup. Serve immediately. Yield: 8 servings.

Editor's Note: If mint chocolate chips are not available, place 2 cups (12 ounces) semisweet chocolate chips and 1/4 teaspoon peppermint extract in a plastic bag; seal and toss to coat. Allow chips to stand for 24-48 hours.


From Taste of Home


Quick Ghost Cookies
18 Servings
Prep/Total Time: 30 min.

Ingredients

1 pound white candy coating, coarsely chopped
1 package (1 pound) Nutter Butter peanut butter cookies
Miniature semisweet chocolate chips

Directions

In a microwave, melt candy coating; stir until smooth. Dip cookies into coating, covering completely; allow excess to drip off. Place on waxed paper.

Brush ends with a pastry brush dipped in coating where fingers touched cookies. While coating is still warm, place two chips on each cookie for eyes. Let stand until set. Store in an airtight container. Yield: about 3 dozen.


From Taste of Home


Strawberry Ghosts
30 Servings
Prep/Total Time: 30 min.


Ingredients

30 fresh strawberries
8 ounces white baking chocolate, chopped
1 teaspoon shortening
1/8 teaspoon almond extract
1/4 cup miniature semisweet chocolate chips

Directions

Wash strawberries and gently pat with paper towels until completely dry. In a microwave-safe bowl, melt white chocolate and shortening at 50% power; stir until smooth. Stir in extract.

Dip each strawberry in chocolate mixture; place on a waxed paper-lined baking sheet, allowing excess chocolate to form the ghosts' tails. Immediately press chocolate chips into coating for eyes. Freeze for 5 minutes.

In a microwave-safe bowl, melt remaining chocolate chips; stir until smooth. Dip a toothpick into melted chocolate and draw a mouth on each face. Yield: 2-1/2 dozen.


Tuesday, October 4, 2011

Witch Finger Cookies ~ Day 4

VIA


There are a million recipes for making these cookies. I personally think the one I've used for the last several years is the yummiest but I'm sharing this one with you today because I think it's quite unique. I haven't seen them dipped in neon candy coating before, have you?

Recipe Ingredients

• 1 can (8 oz) almond paste
• 1/2 cup granulated sugar
• 1/2 cup (1 stick) butter, softened
• 1 large egg
• 1/2 tsp vanilla extract
• 1/2 tsp almond extract
• 1 1/2 cups all-purpose flour
• Pinch salt
• 1 cup each green, orange and violet melting wafers (Wilton Candy Melts)
• 2 tsp vegetable oil
• 1/2 cup sliced almonds


Recipe Preparation

1. Heat oven to 350°F. Have baking sheets ready.

2. In large bowl, with electric mixer, beat almond paste and sugar until well blended. Add butter; beat until blended. Beat in egg, vanilla and almond extracts. With mixer on low speed, beat in flour and salt just until blended.

3. Divide dough into three equal pieces. On lightly floured work surface, roll each piece into a 24-in. long rope. Cut each rope into six 4-in.-long pieces. Place about 1 in. apart on baking sheets.
4.Bake 16 minutes or until lightly browned. Remove sheets to wire rack to cool 5 minutes, then remove cookies to rack to cool completely.

5. To decorate:Line baking sheet with wax paper. Melt candy melts according to package directions. Stir in oil and transfer to narrow glasses or cups. Hold cookie by one end and dip into candy melts. Let excess drip off then place on baking sheet and attach sliced almond for fingernail. Chill in refrigerator 5 to 10 minutes, until firm.


MORE TO COME AS.....
...........CONTINUES

Saturday, October 1, 2011

Love the Fall ~ Day 1

It's like I can smell it coming. Fall. I swear, the first hint of a cool breeze in the air and my whole body gets happy. I love the smells, the food, the colors. Everything about fall.

My Ode to Fall....Ahem....


I love partying at The Mouse's House, themed for Halloween. I love playing dress-up and everything in between.


I love all the scary bits and the fun and whimsy, too. It's a rule, I must watch the Great Pumpkin Charlie Brown every year, how 'bout you?


Pumpkin carving, mums and a carnival with all those lights! A light never looked lovlier than on a cool fall night.

Ok. I admit it. I am super duper cheesy but I do love the Fall. Do you? Let's play dress-up tomorrow! Want to?


Saturday, March 5, 2011

"Today You Are You,
That is Truer Than True.

There is no one alive who is You'er than You.” Dr. Seuss


March 2, 1904 - The day Dr. Seuss, Theodor Seuss Giesel, was born. At my house, we think Dr. Seuss is awesomer than awesome. And, Oh! the places he went!


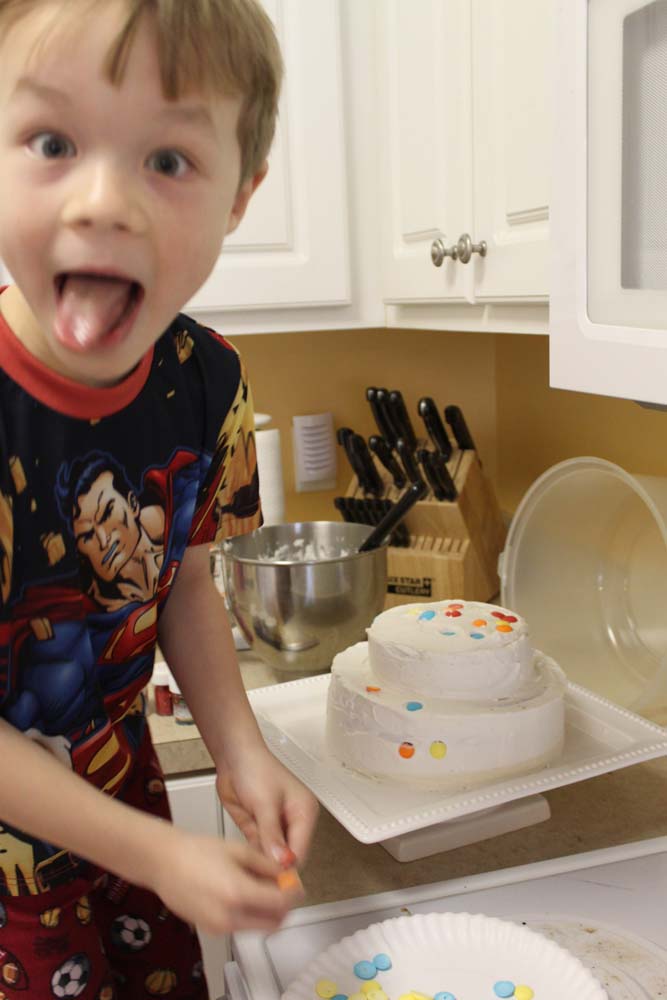
Of course a celebration was in order. So we made a cake.


It couldn't be just any cake, it had to be a cake as big as a lake. Or as tall as a house. Or as long as a snake.


It should have big candy buttons, pink swirly icing and lots of glitter too. The edible kind you silly goob!


And according to Pop,


It just wouldn't be complete without a glop.


A big pink glop. Right on top.


My little chef and I had lots of fun creating this crazy cake. I think we used some of everything in the kitchen!


And he felt that it needed more and more decorating so he eventually wound up decorating the cake stand with glitter and icing too.


I think Dr. Seuss would be proud!


Happy Birthday Dr. Seuss!


*You can find the recipe we used for Dr. Seuss' cake, The Best Chocolate Cake EVER with Buttercream frosting, HERE.

Sunday, February 27, 2011

It's That Time of the Month

When I get to cheat on my diet, of course. What did you think I was talking about?

S'mores Stuffed Chocolate Chip Cookies

Found this recipe over at Picky Palate. I'm not going to share it with you. I'm just going to make you wish you were here. Here with a big glass of milk. You can hop over there and get if you like. I'm too lazy to type all of it out. Or copy and paste. It's probably due to the massive blood sugar spike and subsequent drop from eating one of those cookies.


Anything that starts off with two kinds of sugar is alright in my book. And the perfect way to totally ruin a diet. Which was my plan since I only get to do it twice a month.


And then you add the butta because butta makes everything betta.


While that's mixing, it's the perfect time to assemble the S'mores. Yes. Real S'mores. We are actually stuffing them inside the cookie. For real.


It's nice to have a helper for this part. In my case, it was my 7 year old. And if you're a dork like me and you break the graham crackers into halves, then your 7 year old will tell you, 'Mom, these are halves. The recipe says they are suppose to be in fourths', and you'll feel stupid and proud all at the same time.


There. Nice, eh?


Now, you and your helper can head back over to the mixer and add the rest of the ingredients. If your helper is little, make sure they are very, very careful with the mixer, especially those stand mixers.


They can, and will, take your arm off at the elbow. Or your finger. Whichever you're unlucky enough to get caught in there. So be careful. Respect the power of the mixer.


And, personally, I only allow my helper to use setting number one.


Still, tiny hands can slip or judgement can be impaired at the thought of consuming all that sugar and accidents will happen, so never them leave them unattended.


Then you do something that can only be described as ri-damn-diculous.


I had to take a picture with the box of pudding mix to give you an idea just how massive they are. The recipe is suppose to make 12. I wound up with 10. I tried borrowing from one to give to the other but then I just figured 10 is enough. If you made these often enough, and lived through the massive coronary that occured as a result, you'd probably have a good idea how much dough to use in order to make 12. But again, 10 is quite enough.


I mean look at those monsters! I've gotta tell ya, I think I checked them every 30 seconds. I was sure I'd come back to find what looked like a marshmallow bomb had gone off in my oven. But in about 17 minutes I was rewarded with this....


Yes my friends, it is another successful, diet-ruining day.


Now, if you'll excuse me, I'm going to sleep off this diabetic coma.

Wednesday, January 12, 2011

DIEt


Ahhh New Years. You know how it is. You come up with that impossible list of things you're really, really gonna do this year. Well, I have my list, too. This year I'm going to diet. I've just had a baby and let's face it, I'm fat. And if I'm truthful with myself, and you, it ain't all because of the baby. So I'm dieting. And I was doing just fine until this showed up in my inbox: Mascarpone Oreo Snowflake Cookies from over at KevinandAmanda.com. Yeah that pretty much ruined things for me and I thought, Hey! Why suffer alone?, so I'm sharing it with you. And just remember, if you're thinking of hating me, you should know I was forced to see the cookie pictures right away. You, however, have the option of looking at the cute little hamster eating my lunch instead. Dare you not to look.... ;)
Related Posts Plugin for WordPress, Blogger...
I'm A Member of Art Dolls Only Gettin Creative Every Day Fan of kevinandamanda.com! Free Fonts. Recipes. Scrapbooking. Photography. Blog Design. Tutorials. Giveaway. Everything you're into! My Repurposed Life mmm button Roots And Wings Co U Create ec grab button BWS tips button BWS tips button frou-fruGal Ana White - making a home with handmade furniture and other DIY projects Craft DIY Ideas Show and Tell